Need Assitance?
Call us at 844-203-6588.
We Accept


Original price was: $8,070.00.$6,700.00Current price is: $6,700.00.

Production Time: 2 Business Days After Proof Approval
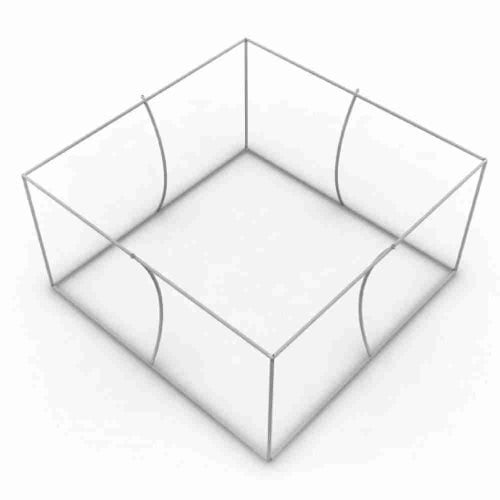
A 20 ft x 72 in square hanging banner fills the air above a large island booth the way few display formats can — six full feet of printed fabric hanging below a rigid 20-foot aluminum frame, visible from nearly every direction on a busy show floor. This configuration is built for exhibitors who need maximum vertical print real estate without sacrificing the clean, geometric profile that square formats deliver. The kit arrives as a complete package: the collapsible steel-and-aluminum frame, all rigging hardware, and a full-color dye-sublimation fabric graphic printed on lightweight stretch polyester. Because the frame breaks down into compact sections, a single person can transport and reassemble it without a freight shipment or a dedicated labor crew. The fabric panel attaches with a simple sleeve system, pulling taut around the frame for a wrinkle-resistant finish that photographs well and reads clearly under arena lighting. You can order a single-sided or double-sided graphic depending on how your booth traffic flows. For exhibitors running a 20 x 20 or larger footprint, this is the configuration that earns its real estate in the ceiling grid.
This particular model is 20ft in diameter and 72in tall.
Graphic is included in price.
(1) Collapsible extruded aluminum hanging sign frame (includes curved stabilizer, quarter circle, curved connector.)
(1) Full color zippered tension fabric graphic print (Outside print)
Nylon travel bag
Hanging Cable
Also includes: chain, spring, eye hook, large screw, hook loop lock, screw tightener
Graphic Material
Fabric
Graphic Finishing
Hem with zipper
Construction
All aluminum frame construction
Warranty
1 Year on Graphic
1 Year on Frame
The math behind drop selection is straightforward: the wider the frame, the deeper the drop needs to be to stay proportional and legible from a distance. A 20-foot-wide square banner with a shallow drop can look ribbon-like at show-floor level — present, but not doing much work. At 72 inches, the graphic panel fills enough vertical space to carry multi-line brand messaging, a logo lockup, product imagery, and a tagline all at once without crowding any element.
At a typical trade show, the bottom of this banner will hang roughly 8 to 10 feet above the booth floor depending on your venue’s approved rigging height. That puts the middle of the graphic right at eye-level sightline for anyone standing within 30 to 50 feet — exactly the distance at which you want to capture foot traffic moving through adjacent aisles.
| Drop | Frame Width | Best Booth Size | Graphic Height Feel |
|---|---|---|---|
| 32 in | 20 ft | 20×20 | Ribbon / accent band |
| 48 in | 20 ft | 20×20 | Balanced, moderate |
| 60 in | 20 ft | 20×20 — 20×30 | Bold, substantial |
| 72 in | 20 ft | 20×20 — 20×40 | Maximum impact |
The 20ft square hanging banner with hardware is engineered for field assembly by a small crew. Here is the sequence most installers follow:
The fabric used in this kit is a tight-weave stretch polyester chosen specifically for dye-sublimation printing. Unlike solvent-printed vinyl, dye-sublimation bonds color into the fiber rather than sitting on top of it, which means the graphic resists cracking, fading, and edge peeling across repeated pack-and-ship cycles.
Colors are produced at high resolution — fine gradients, photographic imagery, and small-point text all render crisply. The fabric is also machine-washable, so a banner that picks up handling marks during transport can be refreshed before the next event. When the show is over, the graphic compresses into a compact carry bag that fits alongside the frame hardware in checked luggage or a standard road case.
If your brand refresh or seasonal messaging changes between shows, replacement graphics are available separately — you keep the frame and swap the fabric. That reusability is one reason the 20ft square hanging banner format is a recurring investment rather than a single-event expense.
The 20 ft x 72 in square hanging banner is one configuration within a wide range of square formats. Exhibitors running a smaller footprint or a secondary area within a larger booth sometimes pair a large ceiling sign with a smaller accent piece. The 8ft square hanging banner works well in a breakout area or hospitality zone where the full 20-foot frame would overwhelm the space.
For portable demo stations or tabletop areas within a large exhibit, the 5ft square hanging banner provides overhead identification without competing visually with the main ceiling sign. Mixing sizes across zones of a large booth creates visual hierarchy — the 20-footer anchors the booth at a distance, and smaller units draw visitors into specific areas.
For a broader look at how square formats compare to circle and other shapes across different booth types, the trade show hanging banner guide covers selection criteria, venue requirements, and rigging basics in one place. And if you want to explore the full range of square options by size before committing, the square hanging banner for island booth category page lists every available configuration side by side.
The custom 20ft square hanging banner page lets you select your graphic options, submit artwork, and confirm hardware details before checkout. Production timelines and shipping options are shown at cart — order early if your show date is firm, since venue rigging schedules often require the sign to arrive at the decorator’s warehouse days before move-in begins.
Upload your artwork, confirm your specs, and get this configuration into production today.
| Weight | 100 lbs |
|---|---|
| Dimensions | 68 × 15 × 9 in |
Products You May Also Like

Clogo 144 Airsquirrels

Clogo 231 Baytek

Clogo 232 Treemendous

Clogo 239 Freightwaves

Clogo 234 Hardyproair

Clogo 237 Redbull

Clogo 241 Animeusa

Clogo 230 Edgefactory

Clogo 236 Fujifilm

Clogo 63 Sclhealth

Clogo 251 Ivanzi

Clogo 242 Wescom

Clogo 250 Snapcab

Clogo 225 United Teleports

Clogo 219 Ecp

Clogo 218 Baylor
Clogo 243 Lord

Clogo 175 Tamucc

Clogo 224 Becker

Clogo 212 Bankofmarin

Clogo 199 Carpetsplus

Clogo 202 Arbor

Clogo 188 Jbhunt

Clogo 197 Meteor

Clogo 193 Randc

Clogo 183 Intuit

Clogo 184 K2 Spas

Clogo 185 Unl

Clogo 187 Cirquedesoleil

Clogo 178 Petra

Clogo 173 Freedom

Clogo 161 Universalorlando

Clogo 159 Paynewest
Clogo 158 Tyson

Clogo 167 Vantage

Clogo 180 Nlp
Clogo 155 Wrs

Clogo 152 Mir

Clogo 151 Vegalab

Clogo 146 Goldfishcons

Clogo 145 Arrowavi

Clogo 156 Frg

Clogo 120 Pga

Clogo 110 Ozark

Clogo 108 Main Even
Clogo 104 Waco
Clogo 91 Seattlepump
Clogo 111 Thechapel
Clogo 134 Bakenjoy

Clogo 133 Act

Clogo 142 Cfn

Clogo 140 Hydrofarm

Clogo 126 Aerofarms

Clogo 135 Scbc
Clogo 137 Ferrumcity

Clogo 94 Miyokos
Clogo 93 Landaw

Clogo 98 Renttruck

Clogo 100 Cpmontana

Clogo 85 Hulu

Clogo 87 Schomp
Clogo 88 Beefjerky

Clogo 103 Amature

Clogo 81 Gartner
Clogo 80 Betson

Clogo 75 Blades
Clogo 73 Roseland

Clogo 72 Vacumax

Clogo 65 Nationwide
Clogo 45 Holanamericaline

Clogo 44 Livenation

Clogo 37 Mobilefleet

Clogo 56 Corporater
Clogo 55 Nextstar
Clogo 36 Oro

Clogo 34 Corecontractors

Clogo 54 Tazikis

Clogo 46 Kbellaspa
Clogo 204 Congoleum

Clogo 32 Veoride
Clogo 33 Bigiron

Clogo 30 Nutrabolt
Clogo 17 Foodmaven

Clogo 24 Comcast

Clogo 21 Radiantcurch

Clogo 05 Nikaochurch
Clogo 28 Bindlecoffee
Clogo 83

Clogo 246 Cstechnologies

Clogo 247 Gainesville

Clogo 52 Godlan
Clogo 08 Theheightschurch

Clogo 12 Go By Greenshield Oragnic

Clogo 14 Backbeat Creative